29.9.14

HALLOWEEN CARD SERIES #2 MINI CARDS AND ENVELOPES

Frightfully Fun Mini Cards

Frightfully Fun stamp set
This adorable stamp set seemed to really say mini card to me. I made four mini cards and envelopes. They were very easy to put together. If you aren't able to catch the measurements, and products I used in the video, I have listed the items below. I hope you are inspired to make a few cards of your own.

Products Used

Chalk it Up paper collection
Frightfully Fun stamp set
Shinhan marker in Peony Purple, Golden Yellow, and Clay
Corner rounder
Scoring board
Paper trimmer or slicer
Adhesive of your choice

Cutting Instructions

The card bases are 3" x 6", scored and folded at 3".
First layer of background and texture paper cut at 2 3/4" x 2 3/4".
Next layer of solid color is cut at 2 1/2" x 2 1/2".
White stamped layer cut at 2 1/4" x 2 1/4".

The envelope is cut at 7" x 4 1/4".
Score on 7" side at 1" and 4 1/2.
Score on 4" side at 1/2" from each end. 

The envelope liner is cut at 4" x 3 1/4"


Thank you for your support. As always feel free to comment below. Let me know if there is a technique or product that you would like to see me make a video and or blog post about.

28.9.14

WINNER OF SEPTEMBER PRIZE ANNOUNCED!

MONTHLY PRIZE DRAWING

Seaside Paper Packet
This morning I used a random number generator, after assigning each of my newsletter subscribers a number, to pick a winner of the lovely Seaside Paper Packet. The winner this month is Beverly! I hope she enjoys my favorite papers as much as I do.

The prize for the month of October is the Home for the Holidays stamp set. It is also the Stamp of the Month for October, and available for $5 with any $50 purchase. Sign up for my newsletter, and you could receive this festive stamp set for free. The sign up box is in the upper right hand corner of the blog. 

An example of what you can do with Home for the Holidays
 If you are planning on making your own Christmas cards, tags, bags, or decor, this is the stamp set for you.

Do you DIY any of your Holiday celebrations. Leave a comment below and let me know your plans.

27.9.14

HALLOWEEN CARD SERIES CARD #1

EEK & SHRIEK

Close to My Heart Eek and Shriek stamp set

Fun folds and googly eyes!

I wanted to make a card than didn't require a die cut machine, and anyone with basic tools could make. I did use my Cuttlebug for one of the layers, but it isn't necessary. You could simply keep the cardstock just as is, or use another print. 

There is a video below so that you can see the card, and how easy it is to put together. I used the Scaredy Cat paper collection from Close to My Heart along with the stamp set.  


Just in case it wasn't clear how I folded the square piece in the middle of the card, here are a few photos.


 First I took a 4 inch square and scored it at 2 inches, turned 180 degrees and scored at 2 inches again. If you don't have a scoring board simply fold the paper in half both horizontally and vertically. I drew pencil lines so you can see a little better.


Next I folded all of the corners to meet in the middle.  Again it is easier to see if you make light pencil lines.

The last step is to fold the points back out to the very edge of the square. Now you are ready to decide how you want to add it to your card. This is a standard A2 sized card measuring 5 1/2 x 4 1/4. The thistle layer was cut at 5 1/4 x 4. The inside layer of double sided paper  was cut at 5 1/4 x 4, and the white layer was cut at 5 x 3 3/4.

Do you make Halloween cards? Comment below and let us know what your plans are for this fun holiday.


24.9.14

CLOSE TO MY HEART WORKSHOP ON THE GO

EASY TO USE SCRAPBOOK KITS

Pathfinding layout

I had a very fun box on my porch when I returned home yesterday. I have never actually seen the Fed Ex man, but I'm pretty sure he is one of my new best friends. Inside the box were 3 of the Close to my Heart Workshop on the Go kits. You can check out the video below to see what the items in each kit look like. I don't think I was clear in the video about the cardstock colors in each kit. I am going to list them along with the recommended ink colors for each kit.

Pathfinding Workshop on the Go

Six 12 x 12 background and texture papers (2 each of 3 double-sided designs)
Exclusive Stamp Set
Two Colonial White cardstock
Two Champagne  cardstock
Two Chocolate  cardstock
One Autumn Terracotta  cardstock
One Goldrush  cardstock
One Olive  cardstock
Ten-piece wooden and cork adhesive-backed assortment
Bling gems assortment
One Instructional Brochure
Recommended Ink Colors are Autumn Terracotta, Chocolate, Goldrush, and Olive 
Confetti Wishes Scrapbook Layout

Confetti Wishes Workshop on the Go

Six 12 x 12 background and texture papers (2 each of 3 double-sided designs)
Exclusive Stamp Set
Two Canary cardstock
Two Pacifica cardstock
One Crystal Blue cardstock
One Thistle cardstock
Two Kraft  cardstock
Two White Daisy  cardstock
One Package assorted dimensional embelishments
One Gold Shimmer Trim
One Instructional Brochure
Recommended Ink Colors are Canary, Pacifica, Pear and Thistle
Seaside Scrapbook Layout

Seaside Workshop on the Go

Six 12 x 12 background and texture papers (2 each of 3 double-sided designs)
Exclusive Stamp Set
Two Desert Sand  cardstock
Two Glacier  cardstock
Two Colonial White  cardstock
One Sorbet  cardstock
One Pear  cardstock
One Package Aqua Dots
One Package Seaside Assortment
One Instructional Brochure
Recommended Ink Colors are Desert Sand, Glacier, Pear, and Sorbet


Have you used a Workshop on the Go kit before? Please leave a comment or any questions below.


22.9.14

UPDATE ON FUNDRAISING FOR CANCER RESEARCH

THE DAMON DIVAS

Damon Divas 2013

Our walking team has been hard at work raising funds for the Leukemia and Lymphoma Society. We have raised $1234.00! Our total was just over $2000 last year, and we are hoping to break that record. 

If you are interested in helping the Leukemia and Lymphoma Society raise funds for cancer research, here is the link to our fundraising page  This will be our 3rd year to walk for this worthy cause. Taking part in the annual Light the Night Walk, along with donating a portion of my Close to My Heart profits, is how I do my part to help further important research. Since I have personally benefited from  recent research, giving back is extremely important to me.

Do you have an important charity that you raise funds for? Please feel free to leave a link to your favorite charity in the comment section below.
 

21.9.14

FUN WITH THE ARTFULLY SENT CRICUT CARTRIDGE ~ POP UP CARD


POP UP CARD THE EASY WAY!


Home Sweet Home

I spent the morning playing with the Artfully Sent Cricut Cartridge. No big surprise, right? Pop up cards are so easy with this cartridge. I decided the Whimsy color collection and Family is Forever stamp set would look great with the Home Sweet Home  card. 

Here is the list of items I used:

Artfully Sent Cricut Cartridge
Pixie and Black Dye Ink Pads
Rub and Remove Eraser 
Pixie, Crystal Blue, Sweet Leaf, and Canary Cardstock
Family is Forever Stamp Set

I made a video to show how easy this card is to put together. I hope you enjoy it. I am still very new at making videos, but each one gets easier.


As always, please comment below with any questions. Also, let me know if there is a video you would like to see. 

19.9.14

ADVENTURES WITH MY CRICUT I

Artfully Sent Cartridge - Page 4

Artfully Sent and Brushed Collection
 I have been wanting to make something with the Brushed Paper Collection, and I finally got the chance today. I fired up my Cricut, opened up Cricut Craft Room, and picked a theme from the new Artfully Sent Cricut Cartridge. All of the cards I made can be found on page 4 of the Artfully Sent booklet. I made four different types of cards: a scene, pop-up, sleeve, and pocket card. I didn't make the sentiment card but maybe I will get around to it this weekend. 

Below is a video that will give you a better idea of how easy these cards are to put together. This new cartridge really does make it easy to create cards that look like they were difficult and time consuming. 


 If you would like to own this cartridge or paper pack for yourself, click on the "Shop Now" button, or email me at dedraclutz@hotmail.com. Don't forget that I am offering a dye ink pad in the color of your choice to anyone who orders the Artfully Sent Cartridge from me. Do not add the ink pad to your order, email me your color choice, and I will send it directly to you.

Please let me know what you think of the new cartridge, and Brushed Paper collection in the comments below. 

18.9.14

ARTFULLY SENT WALK THROUGH

25 THEMES AND HUNDREDS OF POSSIBILITIES!

I have bravely made a video because I want you all to see why this new Cricut cartridge is causing such excitement. 

This is only my second attempt at a video, and my first with a new camera. Hopefully, my video making will continue to improve since I can't blame my crappy camera any longer.

 As I have time to use more of the features on this cartridge, I will share my creations with you. Remember, if you purchase $150 in Close to My Heart products from my website, either all at once, or through my Crafts for a Cure Club, you will receive $25 in free product.  Purchasing this cartridge collection also qualifies you for an exclusive dye ink pad in the color of your choice. Do not add the ink pad to your order, contact me, and I will send it directly to you.

Please comment below with any questions you may have about this great deal.

17.9.14

ARTFULLY SENT IS HERE!

A CARD MAKER'S DREAM!

The FedEx man left a nice little package on my front porch this morning. Once I opened the new Artfully Sent  Cricut Cartridge I had to sit down and attempt my first card. I thought I would stick with the Halloween theme, and try one of the pop-up cards. There was a little bit of a learning curve, but I can already tell I will be in card making mode for quite some time.


Inside of Halloween Pop-up card.
I used papers from the Close to My Heart Scaredy Cat Paper Pack, and Creepy Creatures stamp set. For the outside the only part that I used from the new cartridge is the very cool spider. 

I really love this stamp set.
 After looking over some of the intricate cuts on this cartridge, I really must get the new Cricut Explore.

Stay tuned for more cards this week. I have not even opened my CTMH Brushed paper pack, but I think I will tomorrow, so I can create a really girly pop-up card.

If you NEED this new cartridge you can only order it from a Close to My Heart consultant. If you order from me you qualify for my Crafts for a Cure Club, and receive a dye ink pad of your choice. 

Here is the link to my previous post regarding all of the perks you get along with this awesome cartridge. 

Which one of the Cricut Cartridges is your favorite? Do you use any of them to make cards?

16.9.14

A CRAFT ROOM OF MY OWN ~ PART 2

ALMOST DONE!

MORE HARD WORK

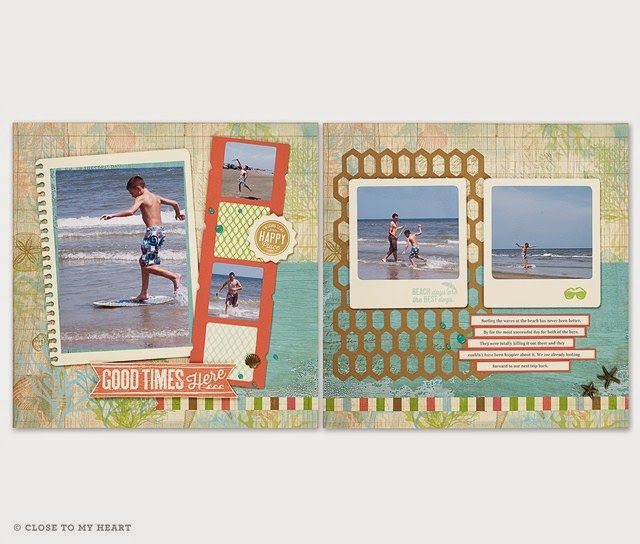
An area to share my love of crafting
Thanks to my mother (aka the slave driver), the furniture is all in the new room. I have plenty of room to have others over for crops, and workshops. 

I have a large L-shaped area now with machines on top and cubes under.
I can now have my laptop, Cricut, Cuttlebug, Bind-it-All, paper trimmers, and scoring boards on view, and easy to access. Underneath I have lots of storage. All of the current Close to My Heart paper collections, and coordinating cardstock,  have their own space. I have drawers that house my Close to My Heart business supplies all nice and organized. Can you tell where I will be doing most of my crafting? My VersaMat and scrap-a-ma-bob are ready, and my favorite tools are within arms reach.

Yes, I painted my desk pink, and added a chalkboard section
I love that there is room for a desk. The blue painters tape was used to decide where the big pieces of furniture would fit. The plastic drawers house all of my embossing folders, and Cuttlebug supplies. I also have a drawer for adhesives: dots, foam tape, liquid adhesives, and tape gun refills. Another drawer has heat embossing supplies, and the third drawer holds all of the accessories for my Bind-it-All. The slots above the cube drawers hold chipboard, and ready made covers for mini albums. 

Sections to separate all of the new CTMH goodies
 I have room for each CTMH cardstock collection; Basics, Enchantment, Adventure, and Whimsy. As you can see I still need the Adventure collection. Underneath is Chalk it Up, Scaredy Cat, a space for Pathfinding, and Yuletide paper collections. I have other cubes for the rest of the new paper collections, and a couple of open slots for the collections that will come out in December. The rolling cart will be used for projects that I am currently working on.  My goal is to break the bad habit of having whatever I am working on covering my work area.
Love having room for a bookcase also!
I have ribbons, and buttons, on display in jars on the top shelf. Seasonal ribbon, and boxes full of Tim Holtz distressing supplies are on the second shelf. The third shelf has all of my reference magazines, and books, including the new Annual Inspirations idea book. You can see I have three of the small Close to My Heart storage containers. The small containers hold my sponge daubers, pigment inks, and acrylic stamp blocks. On the bottom shelf I have the medium organizer with all of my Picture My Life supplies. The large container has all of my stamps. The pink stacking shelves hold my grandchildren's supplies, although they always feel free to use any supplies.

WHAT'S LEFT?

The walls are empty and that just won't do. I have pegboards, bulletin boards, art, and a calendar that needs to be hung. I also need to find new outlet covers, and switch plates. Hmmmm, should I paint them pink? Obviously, removing the painters tape from the floor needs to be done. I have one grey file cabinet that will get a coat of pink paint, and I think I may need a second one. I would like to organize my genealogy papers into the second file cabinet. 

THANK YOU! THANK YOU!

I have to thank my husband and mother for all of the labor, and daughter Audrey for supplying some of the paint. Also, thanks to my friend Linda for the awesome padded folding chairs. 

Now, who wants to come over and play? 

13.9.14

WHY NOT HAVE A DIY HALLOWEEN?

MY  HALLOWEEN PLANS


My first two Halloween cards of the year

CARDS

I have about 10 kids under the age of 10 that I will be making Halloween cards for. I guess 2 is a good start, right? I'm loving some of my new Close to My Heart Halloween supplies so much, I might have to make a few for the over 10 set. 

These cards were made with white daisy cardstock, papers from the Scaredy Cat paper pack, the Creepy Creatures stamp set, What a Hoot stamp set (August stamp of the month and no longer available), and a mix of Shinhan and Copic alcohol markers. I also added a little glossy accents, and glitter marker here and there. I never feel like a project is finished until there is a little bling or glitter. 

DECORATIONS

A couple of our favorite Halloween decorations will need to be replaced this year I'm afraid. Our motion activated ghoul was a big hit with the grandchildren, but I don't think it will last through this season. I really hate to buy another one, so I have been thinking about some other decorations. Maybe a burlap wreath? I feel like I am the only one who has not crafted with burlap. How adorable is this witch wreath I found on the Reason to Come Home Blog. I'm not sure I am up to it, but the lovely Paige sure made it look easy.


 I have also been thinking about decorating some of the faux pumpkins I keep seeing at Michael's and Hobby Lobby. It is often so warm here in October that real pumpkins turn to mush quickly. Wouldn't a few glow-in-the-dark pumpkins be great? I'm loving this mummy pumpkin I found directions for on the Michael's website. 
Glow-in-the-dark mummy pumpkin
Besides some pumpkin creations, I would like to make my grandchildren a Halloween countdown calendar. I think they get more excited about Halloween than they do Christmas. 

TREATS

Trick or treat night seems to be a thing of the past, at least around here. I think most attend fall festivals and parties instead. I will put together some treat bags just in case we get a few knocks on the door, and also for the young children we know. I have Stayzon ink so I will probably stamp and decorate treat sized ziplock bags. Michael's, Hobby Lobby, and the various Dollar stores, usually have erasers, pencils, notepads, etc that can be put in the treat bags. I will try to limit the sugary and noisy items so I stay in the parents' good graces. If you want an easy DIY treat bag option, the Close to My Heart Cut Above Kits are adorable. 
CTMH Cut Above Halloween Treat Bags

My grandchildren at a fall festival two years ago

 I'm also certain I will sit down in front of my Cricut, sign on to Cricut Craft Room, and come up with more ideas for Halloween decor and treats. If I am short on ideas, I'm sure fellow crafters will soon be posting their own ideas and creations on YouTube and Pinterest.  

Have you started planning for Halloween or Fall fun? If so, let me know your plans. 

Don't forget when you place an order for any of the awesome new Close to My Heart products you are entered into my Crafts for a Cure Club and well on your way to earning free products. Find more info by clicking on the Join the Club tab at the top of this page.


11.9.14

THE NEW CRICUT CARTRIDGE IS FINALLY HERE!

ARTFULLY SENT IS AVAILABLE TODAY ~  9/11/14!

A cardmaker's dream

CALLING ALL CRICUT LOVERS

The long awaited release date of the new Close to My Heart Cricut Cartridge has finally arrived. If you are a cardmaker, or long to be, this is the cartridge for you.


If you order this cartridge from me, you will be automatically be entered into my Crafts for a Cure Club. See the details of this club here ,and learn how to earn free stuff the easy way. You will also get to choose an exclusive dye ink pad (color of your choice) as my gift to you. Do not add the ink pad to your order. E-mail me with your color choice and I will send it directly to you. :-)

Don't forget your order will also qualify you for the $5 stamp of the month. 

I am ordering mine today! If you are as excited as I am, simply click on the "Shop Now" button, or click here to go directly to my CTMH website, and order yours today. If you have any questions, leave them in the comments below, or email me at dedraclutz@hotmail.com.

9.9.14

A CRAFT ROOM OF MY OWN ~ Part 1

THE MAKING OF A CRAFT ROOM

 
CTMH has organizers in 3 sizes with various inserts

THE PLANNING STAGE

I have been  dreaming and planning my ultimate craft space for over a year. I am currently using a room that I just took over without any planning. I have a lot of mismatched items, the walls are still a lavender color I really don't like, and I don't even want to talk about the carpet. Now that I have been crafting awhile I have a pretty good idea of how I work. Here are some of the things I have done while waiting for a larger craft space:

  1. I created a pinterest board and pinned everything and anything I thought I might like in my craft/office space. You can view my pinterest craft room and office space board here

  2. I arranged and rearranged my current space as I crafted. I soon realized I needed my Cricut and printer near my desk, as I use both with my laptop. I do not like to move machines around as I work. I also discovered I need to view my supplies, so closed storage is not my favorite.

  3. I decided that since pink and green were quickly becoming my accent colors, I would use grey and white for my walls and furniture.

  4. I purchased some stackable storage cubes from Michael's, clear plastic storage bins from Close to My Heart , a label maker, and a book shelf.

     
    Michaels' Recollections cubes  come in lots of styles

THE HARD WORK STAGE

I have been unable to help with most of this stage, and greatly appreciate family members who have put in the work.

  1. So far my only participation in this stage has been to scrub the baseboards.

  2. My darling husband has removed the sliding closet doors. I'm hoping we can re-purpose them into a large work area. 

  3. My daughter purchased a wall color called "Diving Dolphin" and the painting is almost finished (again the work was done by my husband.) 

  4. The existing, fourteen year old, carpet has been removed by my darling husband.

  5. My husband found some great tile in different shades of grey, and the installation is in progress by . . . guess who? 

  6. I will be spray painting an old file cabinet pink, and painting my desk pink also.

  7. The really hard part of this stage will be moving and organizing all of my existing supplies. I may even have to *gasp* purge some of my supplies. Thank goodness organizing other peoples' stuff is one of my mother's favorite projects.


 Stay tuned as the work progresses. I will be posting pictures as it all comes together. Do you have a craft space of your own? If so, what are your favorite features, or ones you wish you had? Comment below, any suggestions are greatly appreciated.


1.9.14

CLOSE TO MY HEART SEPTEMBER SPECIALS

ONCE SEPTEMBER IS GONE, SO ARE THESE SPECIALS!


 The September Stamp of the Month is Family is Forever, and the possibilities are endless with this gorgeous set. This stamp set is just $5 with any $50 purchase.

To celebrate National Stamping Month, Close to My Heart is offering the #30 Days of Happy stamp set. The stamp set is absolutely free when you purchase $30 worth of stamps. 

 And don't forget I will be doing a random drawing of my newsletter subscribers.
This month's prize will be the Seaside Paper Packet, which happens to be my favorite collection in the new Annual Inspirations idea book.

Seaside Paper Packet

Here is a scrapbook layout using Seaside.
 If you would like to sign up for my newsletter, simply enter your email address into the newsletter subscription box. Besides being entered into monthly drawings you will receive a weekly newsletter with all of the latest news, and specials.


Blog design by Rainy Day